How to easily fix Glass Mounting Adhesive Failures!


If improperly installed, our Permanent Fixed Glass Tablet Mounts / VidaMounts will not be as “permanent” as they were designed to be... but fear not! Let’s review to understand how and why this could happen - so that we can learn how to fix your iPad / tablet kiosk or conference room setup!
Hint: The secret is not in the adhesive bonding strips - but the preparation for it.
First, we will need to reinstall our tablet's permanent glass VidaMount. New Permanent Fixed Glass adhesive kits are available and will be needed. Once we have these new adhesive kits and the old adhesive strips have been 100% removed, it’s time to try again - but be sure to follow these more detailed instructions this time around:
--
Step 1: Cleaning the Glass (The Most Important Part)
Using the included alcohol wipe, clean the glass surface where we will be mounting the wall plate. Be sure the surface is free of dirt, grime, or other debris to ensure a permanent installation.
Note: Take the time & effort to properly clean the glass surface. Any contaminants will compromise the kit’s adhesion strength. Additional cleaning may be required above and beyond using the supplied alcohol wipe to ensure the surface is truly clean.
Most likely, improper cleaning of the glass is the reason why the adhesive strips did not properly adhere to the glass. Also please do not use common glass cleaners such as Windex, Glass Plus, etc.
Reasons:
A) These cleaners often leave film and streaks, which is excess cleaner dried upon the glass. This excess cleaner will remain in between the adhesive strip and the glass, which will prevent full adhesion.
B) Also such cleaners will leave debris and residue from the cleaning wipe, paper towel, rag, etc. These fragments and extremely small pieces of the wiping cloth will add a layer between the adhesive strips and the glass.
Alcohol wipes are the best cleaner for our permanent glass adhesive kit and are included in the kit. This is because rubbing alcohol is volatile and full evaporates. This means it will not remain as a layer between the glass and the adhesive. Also the alcohol wipe does not leave (or hardly leaves) any fragments of the wipe behind after using it.
--
Step 2: Cleaning the Mount (The Second Most Important Part)

Next, wipe the back of the Wall Plate that will be mounted (both mounts shown below). Be sure the surface is free of dirty, grime, or other debris to ensure a permanent installation.
The second most likely reason for adhesive failure is due to improper cleaning of the mount before the adhesive is applied. As with the Glass cleaning, please do not use common glass cleaners such as Windex, Glass Plus, etc. for the above stated reasons in Step 1.
--
Step 3: Applying Adhesive for Mount Only
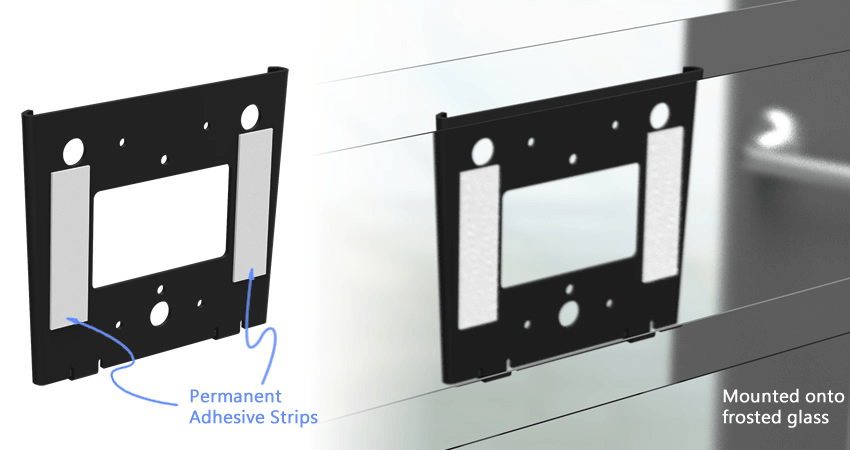
Apply the multiple adhesive strips onto the back of the wall plate. (Same surfaces as step 2) DO NOT REMOVE the backing tape yet. It is important to leave the backing tape on for as long as possible. This will prevent debris, fragments and other contaminants from coming into contact with an exposed adhesive strip surface.
To make sure that there are no air bubbles between the metal bracket and the adhesive bonding strips:
- Place the assembled bracket with the now-applied adhesive strips onto a desk, with the strips sandwiched between the desk and the bracket.
- Using both hands, PRESS HARD against the bracket (similar to doing a push up, but against the bracket) with great force, at least 5-10 times
The repeated pressure applications should force out any air bubbles remaining, to ensure that there is a strong adhesive bond between the metal bracket and the strips themselves.
--
Step 4: Assemble the Tablet and Enclosure
Next, install the enclosure to the VESA plate, then mount it onto the wall plate WITHOUT REMOVING THE BACKING TAPE. Place it on the glass wall at your ideal, final position. Basically this will help provide an example as to what the finished installation location will look like.
--
Step 5: Confirm Optimum Alignment
Be sure this position is satisfactory BEFORE proceeding. WARNING: ONCE THE ADHESIVE IS APPLIED, it will be EXTREMELY DIFFICULT / IMPOSSIBLE TO REMOVE. Once you're happy with the optimal alignment and position of the glass mount - you can move onto Step 6.
--
Step 6: Install – and PRESS HARD to get rid of bubbles
Once you’re satisfied with the placement, we can now remove the backing tape. Adhere the mount directly onto the glass wall – and PUSH against the entire mount (similar to Step 3) to ensure that the adhesive strips are bonding to the glass 100%, without any air bubbles.
Check and take a look at the BACK of the glass and check for bubbles. If bubbles are seen, be sure to PRESS HARD, starting from the bottom to the top – and try to eliminate the bubbles.
Once 100% of the strips are bonded with NO BUBBLES – the installation is now finished.
--
Enjoy a More Permanent Re-Install
It is always best to do things right the first time, but we know that life doesn’t always allow us to exercise this option. We hope that we have demonstrated the reasons why an adhesive strip failure has occurred. There is no shame in having to Re-Install the Permanent Glass VidaMount for tablets which you’ve chosen. In the words of W.E. Hickson “If at first you don’t succeed, try, try, try again”


