How to: Cut Clearance Notch for On-Wall Slim VidaMounts / For on-wall cable runs


For on-wall cable runs
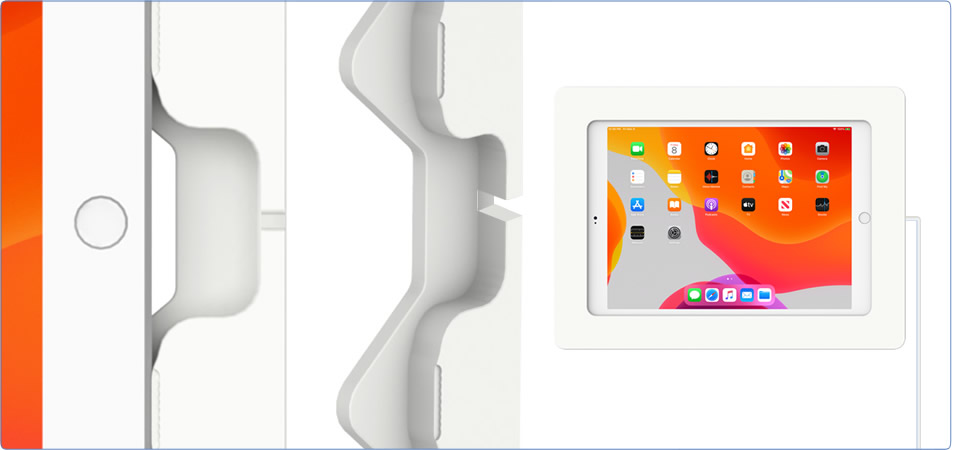
Looking to wall mount an iPad or tablet with our On-Wall Slim mount - but we can't / don't want to run cables through the wall to keep the tablet charged? Simply add a clearance notch using a Dremel or other wood carving tools, and have the cable come out of the tablet's edge instead! Learn how below:
Our VidaBox on-wall slim VidaMounts are a very popular choice for home setups for a wide range of reasons. With your choice in white or black, their front face plates are easily paintable, and once installed, they surface mount perfectly flush with the wall.
Most installs generally prefer to hide all of the wiring in the wall, and get charging power via either a CAT5 based adapter, or some type of recessed power outlet. However - this may not always be possible! If our setup is a retrofit, and the wall surface is cinder block, or other masonry material - it may be nearly impossible to add new wiring!
To still get charging power to a mounted iPad, Samsung Galaxy Tab, Microsoft Surface tablet, or Amazon Fire tablet, the answer is to cut a clearance notch into the side of the On-Wall Slim Mount - then run the charging cable out of this clearance notch, and connect it into the outlet desired!
** WARNING ** These steps below are provided for educational purposes only. Any modification information regarding VidaMounts - such as, but not limited to, instructions, procedures, specifications, or details - are provided without any warranty - express or implied. Always hire a professional for best results! **
First, determine the distance of the cable required from your tablet's VidaMount to the nearby outlet! Remember that there are distance limitations on all cables - they cannot be extended indefinitely:
-
Cable Type : Distance
Lightning : 10 feet [3m]
MicroUSB : 15 feet [4.5m]
USB-C : 10 feet [3m]
Important: When using an already long cable, NEVER use an extension cord (e.g. an additional male-to-female cable) to extend the cable. Reason: The power / voltage coming in on the 1st input would drop too much if an additional extension is added - then your charging power source wouldn't charge your tablet (at best) or the additional resistance can generate a heat build up, and damage your tablet / wall charger (at worst).
Pro-tip: Looking for a long, high quality cable that natively fits into our VidaMounts? We have the answer!
- Lightning 10 feet [3m] : vidapower-10-feet-high-wattage-usb-lightning-90-degree-angled-cable.html
- MicroUSB 15 feet [4.5m] : 15-feet-high-wattage-usb-reversible-microusb-cable.html
- USB-C 10 feet [3m] : vidapower-10-feet-high-wattage-usb-c-3-1-cable.html
Once we've determined that our VidaMount is in range of a single power cable, we can look into modifying the piece itself.
Secondly, decide if modification is the best choice, and how it should be done. Adding a clearance notch onto the side of the VidaMount on-wall slim mount is straight forward, but should be done by:
- Persons using the proper safety equipment
Safety first - anyone attempting these modifications must wear proper safety & protective equipment & employ best practices for safety - such as, but not limited to - wearing safety googles, having no loose clothing, etc.
- Experienced handymen or skilled DIYers only
If someone does not have any material modification experience - i.e. no experience with dremels / chisels, please hire a professional / reconsider other options
- Using the proper cutting tools & clamps, correctly prepared for HDPE
The on-wall slim VidaMount base piece is made of HDPE, a relatively soft, easily modifiable, and dentable material compared to wood, metal, and other common materials. Proper tools / clamps must be used to ensure proper success.
Once these criteria are met, we can look at the actual steps of making the notch cutouts.
Lastly, to do the actual cut outs, one can use:
- Clamps with a soft, foam/rubber grip, to prevent marring on the part
- A Dremel with a new cutting wheel, to cut cleanly into the notch
- A water-based marker or crayon, to mark on the part where to cut the notch
1. Mark off the slot / notch to be cut out on the back of the VidaMount. Be sure of the exact location before doing ANY cutting. Remember that the cut cross section only needs to allow the cable to fit through - examine the cable to be used, to minimize the amount of cutting needed.
2. Place the part, front face up + back face down, on the edge of a soft, non-marring table surface.
3. Clamp the part down - ideally, 3 clamps - with 1 clamp on each of the edges away from the edge that's being modified - should be used to ensure the part doesn't move during this process.
4. Once the part is marked, affixed with non-marring materials, and secured against movement - it's time to make the cut!
5. Once the cut is done - test and make sure that your cable can pass through this newly cut channel. That's it!
Not sure how to best proceed with these types of modifications? If so, best to contact a local handyman or fabricators - not only are they best suited to make the modifications, but they may be able to devise a way for you to run the cable needed in/on the wall, without having the modify the part itself!


